Taygun Bulmus
Tuesday, August 11, 2026 | 7 minutes
The Complete Guide to RabbitMQ mTLS in Kubernetes
What
This guide provides step-by-step instructions for generating custom TLS certificates, deploying RabbitMQ on Kubernetes using the official RabbitMQ Cluster Operator, configuring Mutual TLS (mTLS), and testing end-to-end encrypted client connections with Python.
Why
In cloud-native and zero-trust security architectures, standard TLS only encrypts traffic and authenticates the server to the client. Mutual TLS (mTLS) enforces bidirectional authentication: both the server and the client must present trusted X.509 certificates. This ensures:
- Zero-Trust Security: Unauthorized clients cannot connect to your message broker, even if they possess valid username and password credentials.
- Data Confidentiality & Integrity: All AMQP protocol traffic in transit is encrypted using modern cryptographic standards (TLS 1.3).
- Identity Authentication: Certificate fields (such as Common Name) explicitly verify client identity before allowing message publishing or consumption.
Prerequisites
Before proceeding, ensure you have the following installed:
- Docker (running container runtime)
- kind (Kubernetes in Docker)
- kubectl (Kubernetes CLI)
- Helm (v3+)
- OpenSSL (for certificate generation)
- Python 3.9+ with
pip
Step 1: Provision the Kind Cluster
# kind
export CLUSTER_NAME=rabbitmq-test
kind delete cluster --name $CLUSTER_NAME
cat << EOF | kind create cluster --name $CLUSTER_NAME --config=-
kind: Cluster
apiVersion: kind.x-k8s.io/v1alpha4
nodes:
  - role: control-plane
EOF
# Install Cert Manager
helm install cert-manager oci://quay.io/jetstack/charts/cert-manager --version v1.21.1 --namespace cert-manager --create-namespace --set crds.enabled=true
# Rabbitmq Cluster Operator and Topology operator
kubectl apply -f https://github.com/rabbitmq/cluster-operator/releases/latest/download/cluster-operator.yml
Step 2: Generate Certificates (PKI)
Create Certificate Authority (CA)
Generate the CA private key and self-signed CA certificate:
# 1. Generate CA Private Key
openssl genrsa -out ca.key 4096

# 2. Generate Self-Signed Root CA Certificate (valid for 10 years)
openssl req -x509 -new -nodes -key ca.key -sha256 -days 3650 -subj "/C=TR/O=MyCompany/CN=MyRootCA" \
  -out ca.crt
Create RabbitMQ Server Certificate
Generate the server private key, Certificate Signing Request (CSR) with Subject Alternative Names (SANs), and sign the server certificate with the Root CA.
Note: SAN (Subject Alternative Name) entries must be modified to match your network topology. In this setup, we will access RabbitMQ externally via
NodePort, so we include the Node IP along with the Kubernetes internal service DNS names.
# Generate Server Private Key
openssl genrsa -out server.key 2048

# Get nodes IP
kubectl get nodes -o jsonpath='{.items[*].status.addresses[?(@.type=="InternalIP")].address}'

# Generate Server CSR with Subject Alternative Names (SANs)
NODE_IP=$(kubectl get nodes -o jsonpath='{.items[0].status.addresses[?(@.type=="InternalIP")].address}')
openssl req -new \
  -key server.key \
  -out server.csr \
  -subj "/C=TR/O=MyCompany/CN=broker.example.com" \
  -addext "subjectAltName=DNS:rabbitmq,DNS:rabbitmq.rabbitmq,DNS:rabbitmq.rabbitmq.svc,DNS:rabbitmq.rabbitmq.svc.cluster.local,IP:${NODE_IP}"

# 3. Sign Server Certificate (Preserving SAN extensions from CSR)
openssl x509 -req -in server.csr \
  -CA ca.crt -CAkey ca.key -CAcreateserial \
  -out server.crt -days 365 -sha256 \
  -copy_extensions copy
Verify Server Certificate SANs:
openssl x509 -in server.crt -text -noout | grep -A 1 "Subject Alternative Name"
Create Client Certificate
Generate the client private key, CSR, and signed client certificate:
# 1. Generate Client Private Key
openssl genrsa -out client.key 2048

# 2. Generate Client CSR
openssl req -new -key client.key -subj "/C=TR/O=MyCompany/CN=device001" -out client.csr

# 3. Sign Client Certificate with Root CA
openssl x509 -req -in client.csr -CA ca.crt -CAkey ca.key -CAcreateserial -out client.crt -days 365 -sha256
Step 3: Configure RabbitMQ for mTLS on Kubernetes
Create the required Kubernetes Secrets in the rabbitmq namespace:
kubectl create ns rabbitmq
kubectl create secret generic rabbitmq-ca-cert -n rabbitmq --from-file=ca.crt=ca.crt
kubectl create secret tls rabbitmq-server-certs -n rabbitmq --cert=server.crt --key=server.key
Note: This setup uses the official RabbitMQ Cluster Operator (maintained by VMware/Broadcom) alongside cert-manager.
Below is a complete manifest for the RabbitmqCluster custom resource configured for TLS 1.3:
cat << EOF | kubectl apply -f -
apiVersion: rabbitmq.com/v1beta1
kind: RabbitmqCluster
metadata:
  name: rabbitmq
  namespace: rabbitmq
spec:
  override:
    service:
      spec:
        ports:
        - appProtocol: amqps
          name: amqps
          nodePort: 30674
          port: 5671
          protocol: TCP
          targetPort: 0
        - appProtocol: amqp
          name: amqp
          nodePort: 30673
          port: 5672
          protocol: TCP
          targetPort: 0
        - name: management
          nodePort: 31673
          port: 15672
          protocol: TCP
          targetPort: 0
        - name: mqtt
          nodePort: 31884
          port: 1883
          protocol: TCP
          targetPort: 0
  persistence:
    storage: 4Gi
    storageClassName: standard
  rabbitmq:
    additionalConfig: |
      ssl_options.verify = verify_peer
      ssl_options.fail_if_no_peer_cert = false
      ssl_options.versions.1 = tlsv1.3
      ssl_options.ciphers.1 = TLS_AES_256_GCM_SHA384
      ssl_options.ciphers.2 = TLS_AES_128_GCM_SHA256
      ssl_options.ciphers.3 = TLS_CHACHA20_POLY1305_SHA256
  replicas: 1
  resources:
    limits:
      memory: 4Gi
    requests:
      cpu: "1"
      memory: 500Mi
  service:
    type: NodePort
  terminationGracePeriodSeconds: 604800
  tls:
    secretName: rabbitmq-server-certs
    caSecretName: rabbitmq-ca-cert
    disableNonTLSListeners: false
EOF
kubectl wait --for=condition=AllReplicasReady rabbitmqcluster/rabbitmq -n rabbitmq --timeout=300s
Create a user, assign administrative tags, and set full permissions:
kubectl exec -n rabbitmq rabbitmq-server-0 -c rabbitmq -- rabbitmqctl add_user test test123
kubectl exec -n rabbitmq rabbitmq-server-0 -c rabbitmq -- rabbitmqctl set_user_tags test administrator
kubectl exec -n rabbitmq rabbitmq-server-0 -c rabbitmq -- rabbitmqctl set_permissions -p / test ".*" ".*" ".*"
Step 4: Access the RabbitMQ Management Console
Using the test user and test123 password created above, navigate to http://${NODE_IP}:31673 (e.g., http://172.18.0.3:31673) in your browser and log in.
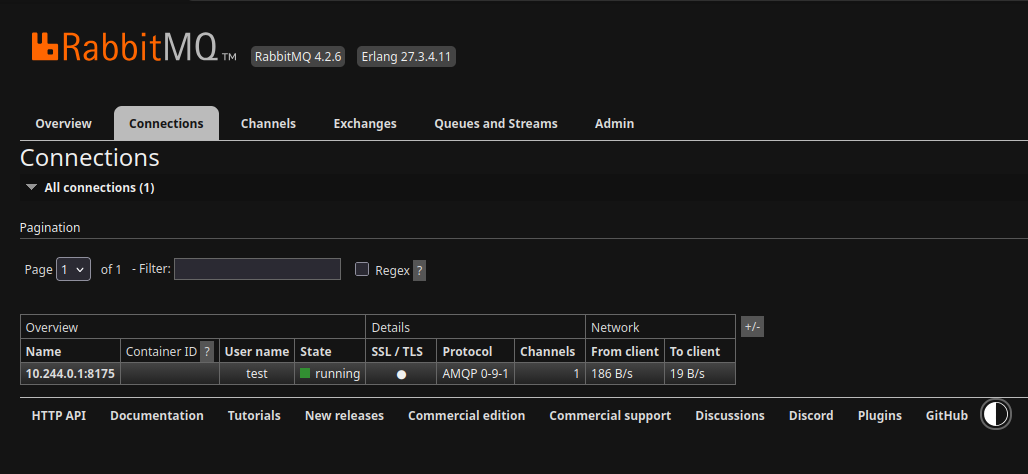
Navigate to the Connections tab to observe incoming client connections in real time.
Step 5: Test the mTLS Connection
To test the mTLS connection, run the Python script below. Remember to update the HOST variable to match your cluster Node IP.
pip install pika --break-system-packages
cat << 'EOF' > test-rabbitmq-tls-script.py
import ssl
import sys
import time
import pika

HOST = "172.18.0.3"
PORT = 30674
VHOST = "/"

USERNAME = "test"
PASSWORD = "test123"

CA_CERT = "./ca.crt"
CLIENT_CERT = "./client.crt"
CLIENT_KEY = "./client.key"

SERVER_HOSTNAME = None

def build_ssl_context() -> ssl.SSLContext:
    context = ssl.SSLContext(ssl.PROTOCOL_TLS_CLIENT)
    context.load_verify_locations(cafile=CA_CERT)
    context.load_cert_chain(certfile=CLIENT_CERT, keyfile=CLIENT_KEY)

    if SERVER_HOSTNAME is None:
        context.check_hostname = False
        context.verify_mode = ssl.CERT_REQUIRED
    else:
        context.check_hostname = True
        context.verify_mode = ssl.CERT_REQUIRED

    return context

def main() -> int:
    ssl_context = build_ssl_context()
    ssl_options = pika.SSLOptions(ssl_context, server_hostname=SERVER_HOSTNAME)
    credentials = pika.PlainCredentials(USERNAME, PASSWORD)

    parameters = pika.ConnectionParameters(
        host=HOST,
        port=PORT,
        virtual_host=VHOST,
        credentials=credentials,
        ssl_options=ssl_options,
        heartbeat=30,
        blocked_connection_timeout=10,
        connection_attempts=3,
        retry_delay=2,
    )

    print(f"[*] Connecting: amqps://{HOST}:{PORT}{VHOST}  (user={USERNAME})")

    try:
        connection = pika.BlockingConnection(parameters)
    except pika.exceptions.ProbableAuthenticationError as exc:
        print(f"[!] Authentication error: {exc}")
        return 1
    except pika.exceptions.ProbableAccessDeniedError as exc:
        print(f"[!] Access denied (vhost/permission): {exc}")
        return 1
    except ssl.SSLError as exc:
        print(f"[!] TLS/SSL error: {exc}")
        return 1
    except Exception as exc:  # noqa: BLE001
        print(f"[!] Connection error: {type(exc).__name__}: {exc}")
        return 1

    print("[+] Connection successful!")

    try:
        channel = connection.channel()
        print("[+] Channel opened.")

        server_props = connection._impl.server_properties
        print(f"    RabbitMQ version : {server_props.get('version')}")
        print(f"    Platform         : {server_props.get('platform')}")
        print(f"    Cluster name     : {server_props.get('cluster_name')}")

        queue_name = "mtls_demo_queue"
        channel.queue_declare(queue=queue_name, durable=True, auto_delete=False)
        print(f"[+] Queue created: '{queue_name}'")

        msg_count = 5
        for i in range(1, msg_count + 1):
            msg_body = f"mTLS Test Message #{i} - Sent at {time.strftime('%H:%M:%S')}"
            channel.basic_publish(
                exchange="",
                routing_key=queue_name,
                body=msg_body,
                properties=pika.BasicProperties(
                    delivery_mode=pika.DeliveryMode.Persistent
                )
            )
            print(f"    [>] Sent [{i}/{msg_count}]: {msg_body}")

        print(f"\n[!] You can check via Management UI:")
        print(f"    Management UI URL: http://{HOST}:31673")
        print(f"    Vhost            : {VHOST}")
        print(f"    Queue            : {queue_name} ({msg_count} messages ready)")
        print(f"\n[*] Keeping connection open for 45 seconds (to view in Management UI)...")
        print("    (Press Ctrl+C to close early)\n")

        hold_seconds = 45
        for remaining in range(hold_seconds, 0, -5):
            print(f"    ... Time remaining: {remaining} sec (Management UI -> Connections / Queues)")
            time.sleep(5)
            connection.process_data_events()

        channel.close()
    except KeyboardInterrupt:
        print("\n[!] Stopped by user.")
    finally:
        connection.close()
        print("[*] Connection closed.")

    return 0

if __name__ == "__main__":
    sys.exit(main())
EOF
Run the script:
python3 test-rabbitmq-tls-script.py
Expected Output:
╰─$ python3 test-rabbitmq-tls-script.py
# [*] Connecting: amqps://172.18.0.3:30674/  (user=test)
# [+] Connection successful!
# [+] Channel opened.
#     RabbitMQ version : 4.2.6
#     Platform         : Erlang/OTP 27.3.4.11
#     Cluster name     : rabbitmq
# [+] Queue created: 'mtls_demo_queue'
#     [>] Sent [1/5]: mTLS Test Message #1 - Sent at 13:28:08
#     [>] Sent [2/5]: mTLS Test Message #2 - Sent at 13:28:08
#     [>] Sent [3/5]: mTLS Test Message #3 - Sent at 13:28:08
#     [>] Sent [4/5]: mTLS Test Message #4 - Sent at 13:28:08
#     [>] Sent [5/5]: mTLS Test Message #5 - Sent at 13:28:08

# [!] You can check via Management UI:
#     Management UI URL: http://172.18.0.3:31673
#     Vhost            : /
#     Queue            : mtls_demo_queue (5 messages ready)

# [*] Keeping connection open for 45 seconds (to view in Management UI)...
#     (Press Ctrl+C to close early)

#     ... Time remaining: 45 sec (Management UI -> Connections / Queues)
#     ... Time remaining: 40 sec (Management UI -> Connections / Queues)
#     ... Time remaining: 35 sec (Management UI -> Connections / Queues)
#     ... Time remaining: 30 sec (Management UI -> Connections / Queues)
#     ... Time remaining: 25 sec (Management UI -> Connections / Queues)
#     ... Time remaining: 20 sec (Management UI -> Connections / Queues)
#     ... Time remaining: 15 sec (Management UI -> Connections / Queues)
#     ... Time remaining: 10 sec (Management UI -> Connections / Queues)
#     ... Time remaining: 5 sec (Management UI -> Connections / Queues)
# [*] Connection closed.
You can also verify the active connection and message queue status in the RabbitMQ Management UI: